Friday, February 19, 2010

Cling Mounting your unmounted stamps

I took a creative break this week and decided to play with a new product I got in the mail from Sunday International.  They're cling sheets that are clear, and I thought I'd try out an idea I've been playing with for a while now.  I prefer to stamp without the foam on the back of the stamp.  I use a foam pad under my paper to get a nice crisp stamped image, and it hasn't failed me yet!  I also am able to keep two layers of unmounted stamps in my CD cases, whereas I'd only be able to keep one layer if I kept the foam.

Here is what I started with:
A piece of this stuff, cut wide enough to fit in my Xyron Machine
StazOn Ink in Black
Acrylic Block
Stamps to work with

FIRST (and very IMPORTANT!) peel the clear film off the backing sheet and flip it over.  Through some experimentation I found one side of this clings to a block better than the other side.  Don't make the mistake I did and stamp on the wrong side!  Stamp your images with StazOn on the clear film, leaving enough room around the images to accomodate the rubber of the stamp.  I use a pad under my paper (or in this case, film) to get a nice clear image.

Peel off the clear film and feed it through your Xyron machine, like so, with the stamped side up:

It will look like this after you run it through the Xyron machine:


I started at one edge of the strip and peeled back the backing a bit at a time, placing each stamp on the strip.  I did it this way because prior attempts got scrunched up and de-stickified when I tried to untangle them!
When you're done, cut them apart and then trim them down so the edges are nice and tidy, (this is before the final trimming):

The cling film sticks perfectly to the CD cases and acrylic blocks!


Thanks for looking!

Cheers!

Thursday, February 18, 2010

Thinking of You Swap Card

Here is a third card from the Mega Swap.  I think this one is one of my favorites!

I used my Scor Pal to give the solid blue piece some texture, and managed to use up my entire stash of these giant silver brads for the flower centers.  I also pierced each scallop around the green circle, it's a really small touch but did a lot to make the flower stand out.  The whole scheme for this card came from the green card bases.  I had 8 of them and one of my swap catagories required 8 cards.  It was a match made in heaven!  (Or at least, a match made at my scrap table!)

Thanks for looking!

Cheers!

Wednesday, February 17, 2010

Father's Day Swap Card

Here is another I did from the Mega Swap, this one is for Father's Day.


The trees stamp is from Stampin Up! and I used copper colored MS glitter on the trees.  This card reminded me of why I dislike glitter!!  I think it turned out pretty well, masculine enough and not too frilly.  I was worried the glitter would be too girly but I think this color works out well!  See?  Not everything Martha Stewart is frilly!

Thanks for looking!

Cheers!

Tuesday, February 16, 2010

Valentines Swap Cards

Since I'm working on Bridal Shower Invites, I'm pretty tapped so far as my creative mojo goes, so here's one I did for the most recent Mega Swap I did with friends:

The kitties stamp is from Inkadinkado, and the So Much Love stamp is from Studio G.  The card is 5 1/2" square, and all the papers are from my stash!  Something quick and easy since I made a dozen of them!

Thanks for looking!

Cheers!

Monday, February 15, 2010

Happy Valentines Day!

Here are the flowers my sweet Hubs bought for me this weekend:

I absolutely LOVE them!  He knows my favorite flower is the Daisy, (Gerbera in particular) and that I prefer Carnations to Roses.  There's even a red Gerbera Daisy tucked in there!  He's such a sweet man, I consider myself very lucky to have him in my life!  :)

Cheers!

Friday, February 12, 2010

January batch of Christmas Cards

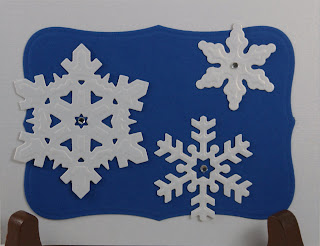
I almost forgot to post these!  I'm trying to stay ahead of the game with my Christmas Cards this year, so I'm trying to make 8 each month so I have 80 done in plenty of time before they need to go in the mail.  Here is the design of the ones I did for January.

I kept these pretty simple but wanted to play with my new Spellbinders Build A Flake dies.  The card bases are stamped with "Let it Snow....Somewhere!" on the inside.  The bases started out as being for a project that would involve quilled snowflakes for the fronts, but that project didn't get too far.  I think I made one card, and I had plans for 18.  So I cannibalized the project in an effort to use up more of my stash!  The blue bases are from my rediculous stash of pre-cut card bases; the paper isn't very sturdy, so I figured they would work better for layering than for bases.  There are little bitty rhinestones in the center of each snowflake, also cannibalized from another project!  I can see more of these snowflakes in my future, since I still have about 4 card bases worth of the sparkly white paper.  I can't use these bases for cards because something was spilled on them.  (You know how often THAT happens at my craft table!!) 

Thanks for looking!

Cheers!

Thursday, February 11, 2010

No Great Things card

So I had grand ideas of making sets of cards for my parents for Christmas.  I finally sent my Mom's set out in January, and finally worked out the design for Dad's set today!  (I'm such a slacker :( )

Here is what I came up with.  The rest of the quote is on the inside of the card, "only small things with great love."  This is one of my Dad's favorite quotes, and I like it because it reminds me to take care in everything I do.  Perhaps I take too much care, though, since I seem to have a hard time finishing anything!  I plan on making a set of 10 of these in different paper/color combinations.  I hope he likes them!

Thanks for looking!

Cheers!

Wednesday, February 10, 2010

Hope & Grace Birthday Card

This card is for a friend whose birthday is TODAY!  Ack!  Unfortunately our letter carrier has already gone by today, so this will have to go in the mail tomorrow.  :(  Not that it isn't already late!

This stamp is from the Hope & Grace set from The Greeting Farm.  I'm not sure if this is Hope or Grace, but I'm leaning towards Grace.  The other girl in the set is more of a tomboy and "Grace" doesn't seem to fit! ;)

The patterned paper is Basic Grey, and the solids are all from my stash.  I used the Swiss Dots CB folder for the background, and the Petite Ovals Nesties set for Grace and her border.  I only had one piece of the purple for the border and wanted to add a border to the sentiment inside, so I cut the center out of the piece you see here!  A girl's gotta make her stash stretch, right?  I stamped her in VersaFine and used my Prismacolors and OMS to color her in.  Enjoy!

Thanks for looking!

Cheers!

Tuesday, February 9, 2010

Valentine Photo Tutorial

As promised, here is a 'lil tutorial for the Valentines I made last week!  For each one you will need the following:

Two 2" x 2 1/2" matching scraps of paper for the pockets
One 4" x 2 7/8" neutral colored base for the "book"
Two 2 1/2" x 3 1/4" matching scraps for the covers
One 12" piece of coordinating ribbon
Scor-Tape or Red Line Tape
ScorPal
regular adhesive, scissors, and of course
CHOCOLATE!!

For each pocket, place it length-wise on your ScorPal and score 1/4" in from the edge, and 3/8" from that score mark.  Rotate your piece and do the same on the other edge.  Then score 1 1/2" from the top edge, then 3/8" from that score mark.  It should look like this when you're done:

Next cut each scored piece as shown, this will prevent too much extra bulk in the bottom of your pocket.

Add pieces of score tape as shown to the bottom and side flaps.  This will hold it securely to the "book" base.

Take your book base (neutral cardstock) and score it at 1 5/8" from each edge.

Attach the two pockets to each side of your book base, keeping them very close to the bottom edge of the sides.  If they're up too high, your chocolate will stick out of the top of the book.

Run a line of adhesive on the front and back covers of your book, NOT on the spine.  Close the book and wrap your ribbon around it, pressing it to the adhesive so it stays in place.  If you stick the ribbon to the book base while it is open, the ribbon will be too tight and the book will not fold nicely. 

I used the Labels Eight Nesties set to cut out the covers for my book, but you can use whatever you have on hand.  Adhere the covers, embellish, and Voila!  You have a super cute way to say "You're Sweet" to someone!

Thanks for looking!

Cheers!

Monday, February 8, 2010

Bridal Shower Samples

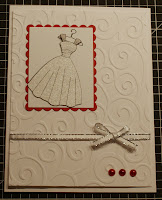
A friend asked recently if I could put together a few samples for a Bridal Shower she is throwing.  I've had some bad card mojo lately so I let this marinate for a bit, but here's what I came up with.  I actually really like these!

I'm having a hard time deciding which one I like best, although I'm pretty partial to the dress.  It's actually on a shiny silver-ish paper, so it adds a little bit of sparkle.  We'll see what she thinks!  :)

Cheers!

Friday, February 5, 2010

Duluth Sunrise

My card mojo seems to be suffering lately, so I thought I'd share a photo I snapped when I drove into Duluth over the weekend. 

Goes to show it's pretty stinkin cold up here!  The steam is from the paper plant as you come into Duluth, and I just loved the way the colors of the sunrise were so soft and muted.  People wonder why I like living in the Northland, and it's moments like this that explain it perfectly!

Cheers!

Thursday, February 4, 2010

Valentines!

Here are the Valentines I've been working on for the girls at work.  I'm the Friendly Neighborhood Chocolate Fairy 'round these parts, so I try to make a little something sweet for the girls when the holidays come around!

I used up the rest of the BoBunny scraps I used for the 10 Patch card for these, plus a few other bits and pieces from my stash.  These were fun to make and I even took photos for a tutorial!  :)

Thanks for looking!

Cheers!

Wednesday, February 3, 2010

GDT Patchwork Heart

Woohoo!  Here is my first sample for my Guest Designer position over at Scrap Our Stash!

I'm excited to finally be able to share it with you!  The challenge for February is to use 10 of something; 10 brads, 10 buttons, 10 shapes, or any combination that adds up to 10.  I used 10 paper scraps to piece my heart!  I've had these scraps leftover from a project I did for my sister a year ago.  It was a BoBunny kit for altering a 6x6 book and I did a mini wedding album for her out of it.  Anyone who knows me knows I have a problem with scraps.  As in "I need a 12-step program" kind of problem!  I have a hard time throwing anything away, if it's smaller than 1" I'll punch shapes out of it, and if it's larger it goes into my scrap system.  I actually have a confession to make: when I had a friend over for a scrappy weekend, I actually went through all the scraps she tossed and saved them!  There was a LOT of paper in there!! :)

There were actually 5 different patterned papers that I used, so you see the fronts and backs of each design.  I cut the scraps into 1 1/4 inch squares, inked all the edges, then pieced them together on a scrap piece of paper.  I ran the whole thing through my Cuttlebug to cut out the heart, then inked the edges of the heart.  The solid red was cut using the Labels 8 set from Nestabilities, and then embossed using the D'Vine Swirl Cuttlebug folder.  I used my sponge dauber and inked the swirls on the red to make them stand out, and also inked the edges of the entire piece.  The sentiment is embossed with the With Love Cuttlebug border set, then also inked.  Yes, I realize I probably need a 12-step program for my inking addiction, too. 

Come join us over at Scrap Our Stash and play along!  We'd love to see your creations!

Thanks for looking!

Cheers!

Tuesday, February 2, 2010

Snow Dogs!

I took a few moments today to go out and throw snowballs at the dogs.  Funny how they got wise to me and hid behind the shed until I stopped!  I hate to admit it, but I throw like a girl, so every snowball I tried to throw at them landed about 10 feet from me!  :)

There seems to be something about fresh snow that brings out the inner puppy in my girls, which is fine when they're outside.  However, when they're inside asking to go out and play every 5 minutes it gets a little un-cute!  I love the way the snowflakes sat on top of their fur and didn't melt.  These girls are definately well insulated!  Unfortunately all that fur will come off when Spring hits... *sigh*

Cheers!

Monday, February 1, 2010

January Goals

I did a little checkup on how I'm doing with my January goals over the weekend.  Here's what I came up with:

Swap cards - 8/month - Check
Christmas Cards - 8/month - Check, I'll post these this week
Other Cards - 1/week at least - Check
Challenges - 1/week at least - Check, to the tune of 9 challenges
Use at least 90% stash for each project - limiting my purchases to only solid cardstock to match paper I already have. - Check, I think the only thing I purchased was adhesive, and that doesn't count!
Scrapbook Pages - 9/month - Definately Check!

I think that's pretty darn good!  Granted, if it hadn't been for the VSBN, a few of these wouldn't have been met.  Those ladies ROCK!

Cheers!