Monday, January 31, 2011

A Night at the Oscars

Here is the layout I did for the first VSBN Challenge on Saturday.  The JoyceAnn's challenge was a great primer to get us all back into the Groove of scrapping again!  The challenge was to start with two or three photos, pick two main colors and one accent color, find two patterned papers in those two main colors.  Then you were to include a title, embellishments in odd numbers, and a journaling block. 


The journaling block I used is from My Minds Eye (I think) and the flower embellishments are stamped with the Aspiration set from CTMH.  I stamped each one twice and cut them out, then curled the petals of the top flower over a pencil and added some liquid pearls to each one.  I wanted to bring out the little touch of rose that is in my dress.  The photos are from the "Oscar Night" we had when I was in 8th grade for our Drama Club.  I won Best Actress in a Comedy for my role in Oliver Twisted.  The play itself was a hoot and these were the only photos I had that were even remotely related!

Thanks for looking!

Cheers!

Friday, January 28, 2011

VSBN Mini is almost here!!

Nothing to post today, since the stuff I've been working on is for tomorrow's VSBN Mini!  Be sure to join us tomorrow at Splitcoast at 2 EST!  See ya there!

Cheers!

Wednesday, January 26, 2011

Coloring Fun!

I finally saved up enough cash to get my first set of Copics!  They arrived yesterday, and I've been doing a little bit of experimenting with them.  Aren't they pretty??

 
I inked up this fun stamp and used some generic cardstock to do some playing around.  I tried a few different techniques, and I definately learned quite a bit!  My first bit of advice would be to work in VERY small areas; it's easier to blend the colors before the ink totally dries.  I also learned that as much as I love my VersaFine ink, it tends to feather with Copics!  I tried a few different color combos too, as you can see on the one pink-ish petal.  I also started with the darkest color on that petal, and starting with the lightest color works much better.

Here's a close up where you can see the shading.  Unfortunately, you can also see one petal where I dropped one of the markers!  Yeah, that didn't work out so well!

You can see my progress in my practicing, too.  I started with the leaves, and as you can see they are pretty blocky.  Then I did the pink flowers. and those are a little less chunky-looking.  Finally I did the orange flowers and started with the lightest color first (an AHA! moment) and those blended very nicely!  I can definately see more coloring in my future!

Cheers!

Monday, January 24, 2011

Making Progress!

I have been getting very inky, but no cards to show for it.  I've been working on cataloging my stamps, and here's the progress I've made!

Yes... it's EMPTY!!  WOOHOO!!  All of these CD cases were filled with acrylic and unmounted rubber stamps.  They have all been indexed and integrated into my Stufftainers.  Granted, I have another drawer to do, plus another HUGE pile, but there's a light at the end of the tunnel!

Cheers!

Friday, January 21, 2011

REALLY?!?

THIS is what I woke up to this morning:


Yes, that's a NEGATIVE sign in front of the 22.0.  *sigh*  I'm looking forward to spring!

Stay warm!

Cheers!

Wednesday, January 19, 2011

CTMH Mega Swap!

Here is the finished product for the CTMH Swap:

 
I used my corner rounder punch to do the scalloped border, since we were restricted to products in the CTMH Catalog.  I think it turned out pretty darn cute!  I doubt I'll be doing much texting in the next week, because the muscles in my right thumb are SERIOUSLY cramped from doing all that punching!  Here's the pile of all 43 cards:

I'm pretty proud of myself for getting these out on time!  Can't wait to see what the other Demos have for their swappies!

Thanks for looking!

Cheers!

Monday, January 17, 2011

Sneak Peek

Here's a sneak peek of some of the CTMH products that will be released in February! 


 I signed up for a swap showcasing this paper line in a 3 x 6 card, and this is what I came up with!  Here's the sentiment on the inside of the card:


Now I just need to make 43 of these bad boys!

Thanks for looking!

Cheers!

Friday, January 14, 2011

One down, 487 to go!

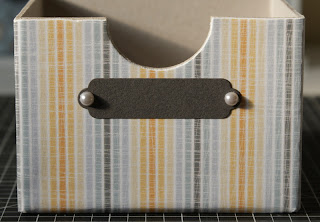
Yay!  I finally finished something on my To Do list.  I picked up a copy of Kaisercraft's quarterly magazine last weekend, and in it they showed a project with their 9-drawer organizer that was oh so lovely!  I've had one assembled (and stuffed full) on my work desk for ages, and the magazine inspired me to finally finish it!


Go figure, I ran out of pearls for the last two drawers, so I can definately see a trip to Michael's in my near future!  Here's a closeup of one of the drawers. 


I started out by covering the back of each drawer with a 4" x 6" strip, cutting the bottom excess to allow for wrapping the paper around the bottom.  Then I held a 4" x 11 1/2" strip to the front and traced around the finger pull, cut it out, and adhered it to the front of each drawer.  Here's a closeup of the seams.


I used my handy-dandy emery board to file off the excess from the top edge, rather than trimming the paper with my craft knife.  I used the knife on the first drawer, and did NOT like the result.  I found the emery board made for a more even edging and softened the seams of the paper.  Filing it makes it harder to peel away the paper from the edge of the cardboard.  The papers are also from Kaisercraft and from the Rustic Craft line.  The palest orange/creamy color matches my walls to a T, and the two patterns are actually two sides of the same sheet!  Once I've figured out what I'm keeping in each drawer I will print out labels for the little bookplates on the fronts.

Thanks for looking!

Cheers!

Wednesday, January 12, 2011

A little more Organizational Bliss

My sweet Hubby took advantage of the 40% sale at Michaels this last weekend and bought this FABULOUS wall unit!  I had such a blast cleaning my room and helping Suz organize hers, that I was inspired to rearrange some of my embellishments into these pretty jars!


I'd had so many of my flowers tucked away into containers that I never saw them and forgot what I had!  I trimmed the wires off bundles of paper roses and put them into Mason jars, and arranged my jars of buttons so I could see everything I had.  The button jars were up on a shelf four deep, so I could only see the jars at the very front.  Here's a close up of how they look now!


I plan on painting and embellishing the SIMPLE letters soon, more on that to come!

Thanks for looking!

Cheers!

Monday, January 10, 2011

Suzie's Stampin Space

This weekend was definately a resounding success!  My good friend Suzie has been wanting to redo her stamping space for quite a while.  Her space is much like mine, where her office and stamping space occupy the same room.  Well, I think I inspired her with my resent cleaning spree, so she asked me to come down and spend the weekend redoing her space!  Here is the before picture of her Work Desk:

 
 And here is the before picture of her Stamping Desk:


The space worked, but I could tell that she wasn't in love with it.  She wanted room to spread out and get all of her supplies organized.  With everything crammed into a corner it was hard to find exactly what she was looking for without tearing everything apart.  One thing that did work was where she stored her embellishments.  They were clearly labeled and easy to reach, so she always knew where to find what she was looking for.  I used that to inspire me on the rest of her room.  Lots of containers that will (eventually) have pretty little labels so she can keep what she uses most right at her fingertips, and put away the thing she uses only rarely. 

Presenting
Suzie's Stampin Space!!

Suzie had several Cubes from Michaels already on hand, we just re-configured them to make a more workable stamping area. The only thing we had to purchase were the boards and brackets for the desktop and shelves. All it took was a little ingenuity, a stud finder, a few wall anchors, and LOTS of patience, and here we go!

Here is the after picture of her Work Desk:

Oh we had fun with this project!  Suzie did all of the purging and sorting and organizing while I did the hanging and running.  Honestly, I think she had the tougher end of the bargain!  Now there's even space available for a guest scrapper without setting up an additional table!

I can see many Mojo-filled days ahead!  Happy Stamping, Suzie!

Cheers!

Friday, January 7, 2011

Road Trippin!

I am heading to a friends house for the weekend to redo a scrap room!!  WOOHOO!!  It's going to be a Dew-fueled frenzy of paper-licious organizing.  Hopefully I will have some fabulous pictures to show off on Monday!  Happy Scrapping!

Cheers!

Wednesday, January 5, 2011

2011 Crafty Goals

I've done a lot of thinking about what I would like to accomplish this year, both with scrapping and all the other crafts I like to dabble in.  Here are some of my goals:

To submit to at least 2 Design Teams
To scrap 30 Layouts
To USE my stash of lovely embellishments, instead of hoarding them

To catalog my stamps
To inventory my stash (dies, punches, paints, stickles, etc.)
To MAIL the cards I make and recieve in swaps
To purge the excess that keeps me from getting to my Sewing Table
To FINALLY finish the multitude of half finished projects in my scrap room
To complete at least two cross stitch projects
To get my Etsy page up and running and build up some inventory

Wish me luck!

Cheers!

Monday, January 3, 2011

What is Simple?

After much deliberation, I finally decided on my 2011 One Little Word:

Simple

We did a lot of closet cleaning and purging over the Christmas holiday.  We brought an entire truckload to Goodwill, and two loads of Electronic Detritus to Best Buy's e-cycle program.  And you know what?  It felt gooooooood!  It was almost like taking a mental deep breath, knowing that we had some clear space and a couple more things knocked off our To Do list. 

Between that and Rachel Anne's post over at Home Sanctuary today, it really got me to thinking about what I want for my home and my family.  I walked through the house looking at things still on my To Do list, cupboards that are full, drawers that need to be sorted, things that need to go on Ebay.  I realized my favorite room in the entire house is my Living Room, because there was nothing in there on my To Do list!  I like that room because the decorations are pretty minimal, there isn't a lot of Schtuff all over every flat surface, and my eyes and mind definately have a place to rest.  It's relaxing to be in there, and I want my entire house to feel that way. 

I want to bring my life to a level of simplicity where I can get back to enjoying life's little spontaneous pleasures, rather than worrying about a never-ending To Do list.  I want to simplify my finances, my posessions, my hobbies, my collections.  I want to cull things down to honor what I'm truely passionate about, and pass on the excess to those in need.  I want to be able to get my home Company Ready in 15 minutes or less, without having to unbury the dining room table!  I want to feel that same sense of peace, not only in my living room, but in every room on my home.  I want my home to be a Sanctuary.

Cheers!

Saturday, January 1, 2011

Happy New Year!!

Today is 1-1-11, what better day than today to make a fresh start?  I was feeling so inspired by the idea of a clean slate that I actually cleaned my room!  *GASP!*


Here is my scrapping table, with all of my Schtuff within arms reach.  Yes, yes, I know.  I need a 12-step program!  There is usually a dog occupying the rug under my desk, keeping my feet warm.


This is my "guest scrapper table," complete with printer and mascot! (ignore the lovely cords underneath!)


He was such a good boy today, he kept me company without complaining about my singing or that I was flinging things all over the place!  Here's to a great year of inky goodness!

Thanks for looking!

Cheers!